Blogging Tips to Make Money Blogging

  • How to Make Money Blogging in 2021

    There are so many bloggers that quit 9-5 jobs because they have made a good and large income from their blog..
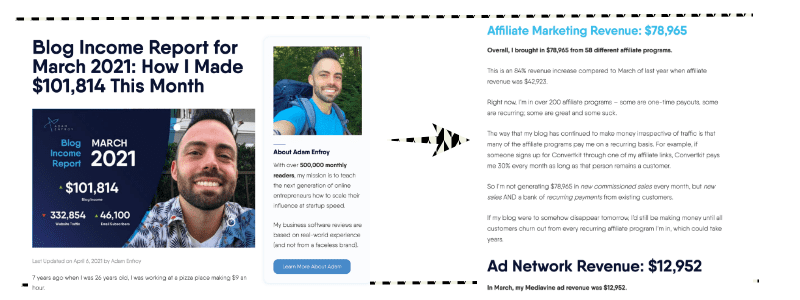
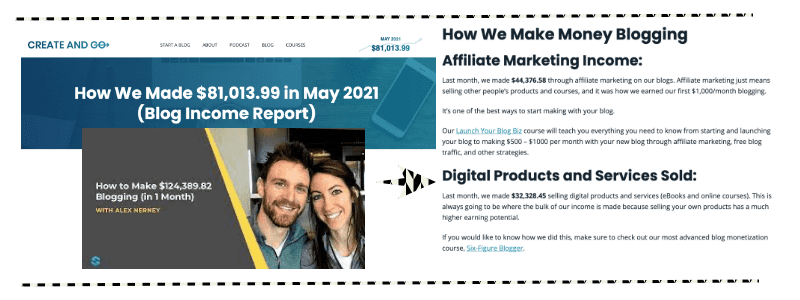
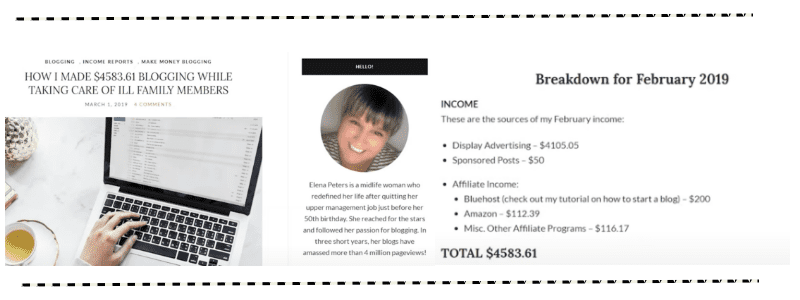
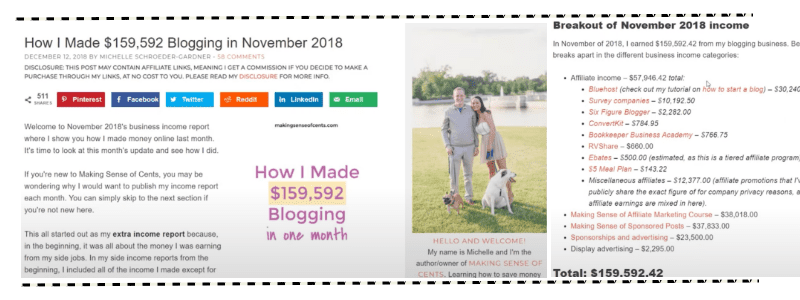
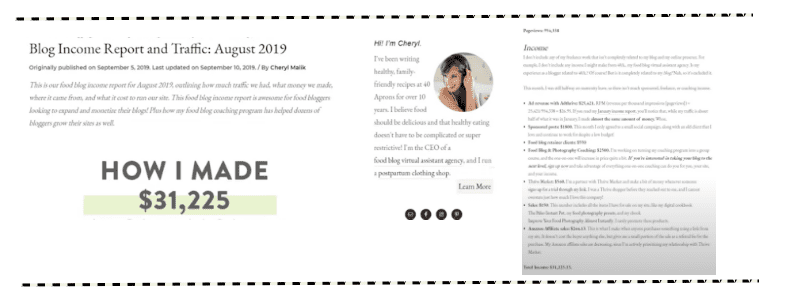
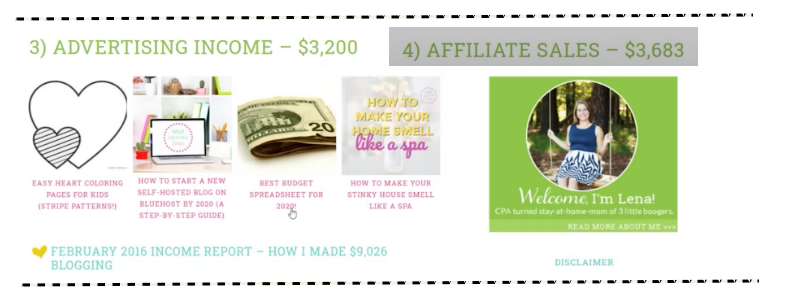
    Here a few of my favourite bloggers that share their income report.

    Not convince yet?

    These are just a few on blogging income report that I compile. To read more and be more inspired, check out Dale from Bloggingherway.com

    >THE ULTIMATE LIST OF 200+ BLOG INCOME REPORTS<

    To be honest, their income report inspired me to start my own profitable blog as well.

    I researched a lot before I start one. And here is the compilation of what I learnt from all of those blogger.

    I basically took one weekend off to read all the articles from those income report back and put together a comprehensive guide here for you.

    I also created a magical bloggers checklist if you want to start a blog or just started a blog.  You can download it  here by entering your email down below.


    [et_bloom_inline optin_id=optin_4]


    First thing first,why you should start a blog?

    1. Express your passion and interest

    Well, if you are a writer at heart, you can express your passion, emotion and skills through writing. Most of bloggers are writers. Except me. I remember back in 2010 , I start a blog to share stories of my life and also express my emotion. I only can write speedily when I was happy or mad. But for me to create a guide or to share tutorials, it could takes months even years or it will simply never happened.  I blog for fun before this. Having said that blogging was once a joy for me because of it community and it was once became my online diaries.

    2. Start A Profitable Online Business

    Now in 2021, I choose to start blogging back and it is not for teenage diaries. This time I choose to start a blog with purpose, mainly for my business. I saw a lot of potential with a blog where it could lead to 9 streams of income..

    🔥9 streams of income by starting a blog🔥

    When you are starting a blog..you basically are starting a digital online business

    1. You can sell your own information or guide
    2. You can sell your own courses
    3. You can start your coaching programme
    4. If you choose not to build your product, you can sell other people products and earn a great commission through affiliate program
    5. You earn income from own display ads
    6. You earn income from an advertising company
    7. You earn income through sponsored post
    8. Start your own digital E-commerce business
    9. Become Virtual Assistant

    Be it your own products or other people products ,blogging is the FIRST MAJOR step (note that I say major) to create a profitable online business .

    Apart from that, blogging also is a great way to establish your authority and it could be a platform that you can showcase your skills and your business.

    3. Low Start Up Cost

    Most of the business model especially physical products business required a huge cost to start. While blogging has a low start up cost, where you only need to pay for domain+host, website themes and tools (I explained a little detailed down here), it can be quite expensive when you start expanding your reach and you want to use fancy-frenzie tools.

    When I first starting up my blog, I only use all the free tools that available. That’s include free theme ,free images, free editing software, free Pinterest scheduler, free email service provider, free opt in software, free FOMO plugins.

    But when you need to upload more photos, you need more blog capacity by upgrade hosting capacity . and when you need more beautiful photos, you need to upgrade that one too!  I also have compiled all the free tools that I use and either I upgraded to paid version or not inside ‘Upgrade me or not’ cheatsheet.

    Nevertheless, it is still the cheapest way to start your own business and empire. If you start it right, you can become successful in short time and only spend on the right things that matters. Check out this blogpost for my entire blogging cost where I have divided into lifetime and monthly/yearly.

    I wish someone told me earlier what is the estimated total cost to spend so I can expect and choose what not to spend so I didn’t splurge too much on unnessary things.

    > Check it here | Brutal Truth – My Entire Blogging Expenses <

    Confusion suck!

    To be honest and I am being transparent here because I just want to give the best and right information for you.

    I have built this website (anysnadhilah.com) for 2 years now but I have zero content on it because I was confused, overwhelmed and I think didn’t I have the clarity on what I have to do to start my business.

    My mindset was all wrong and I was thinking to launch a course and thinking about FB ads all the time to launch my course and position myself as a course creator. In fact, I have not even own a single course and never launch it too. For me, launching a course is scary and you have to give a lot of commitment to it in terms of capital and money to invest.

    This scary and anxiety feeling holds me back. I try to fight it every single day but it failed.

    Unlike Blogging give so much freedom and so much low commitment in terms of costs and it is actually less scary, seriously. It may takes money but it going to be worth it and. it doesn’t take too much money to invest..

    I believe in in – Start small. Grow Big.


    On one evening, the thoughts of what if I’ve started blogging 2 years back on this blog, today must have be totally different.

    HOW CAN YOU START A PROFESSIONAL BLOG IN LESS THAN 7 DAYS

    This is the step-by-step guide on how you can start your own profitable blog and this is my highly recommended roadmap to start a succesful blog.

    If I were a new blogger,I would definitely use this roadmap that I will show you below because this is a timesaving strategy.


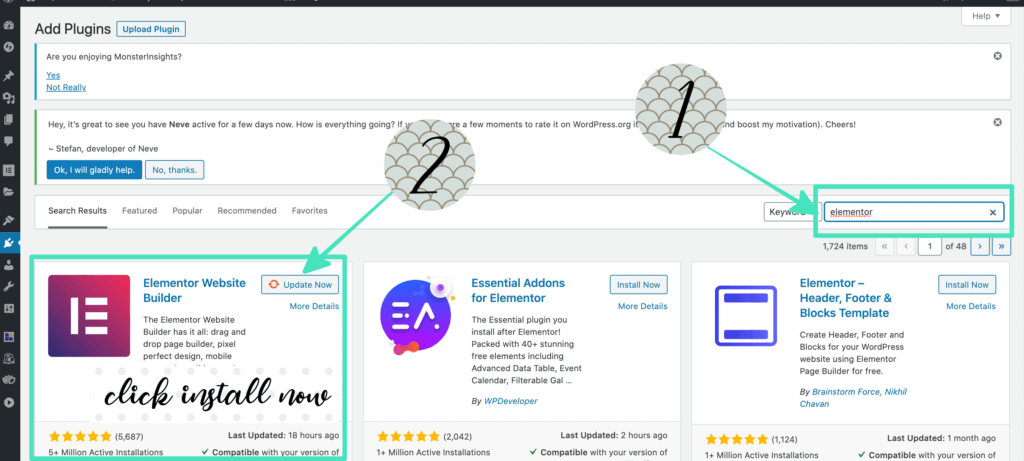
    DAY 1 CREATE YOUR OWN WORDPRESS.ORG ACCOUNT

    Between many platforms that you can start your own blog like to show it.com WordPress.com , square space, blogger.com I would highly recommend for you use WordPress.org .

    Solely because it is a self hosted platform and it is whole lot easier and cheaper to start with. There is a lot of information is out there about wordpress.org and you have so much freedom to customise your blog using WordPress.org.

    Although if you are using other platforms, it will allow you do the same thing but the WordPress.org price is much cheaper in terms of buying domain name and hosting for 1-2 years straight.

    I have created a comprehensive guide on how you can set up your WordPress blog. You can read it here > WordPress for Dummies< .

    Basically I explained simple step by step process that you need to take setup WordPress blog. There is also endless of video tutorials that you can follow to set up your blog if you need more details on that one..

    Did I mention that, WordPress.org is free ?

    and you can install it right away here..>Wordpress<

    Then sign up for domain name and hosting here. >Bluhost<

    DAY 2 BUY A DOMAIN NAME AND HOSTING

    Yes , it is compulsory after you download the WordPress software, you need to purchase hosting and domain name . Here is a simple analogy, if you want to build a house ,you need to buy a land first & register your address, then build the house.

    Land = Hosting
    Address = Domain name
    House = WordPress

    Here is my ugly drawing to emulate the analogy

    At first, buying a domain name and hosting is my biggest limitation before because I am not a serious blogger back then and I am contemplating to spend multiple of dollars for a thing that does not guarantee to give me anything in return.

    But what I did was, I researched on domain & hosting platform that I know I can afford of. Thankfully, I found one.

    Now I have two hosting provider that I recommed.

    1. Bluehost ($2.95/mo* or $59.40/year ($4.95 for 12 months) or $106.20  ($2.95 for 36 months))
    2. NetKl ($30/year – especially those from Malaysia)

    Netkl is a Malaysian based company and it works wonder for my blog. Their customer support also very good and very fast. If you are Asian, I 1000% recommend you to subscribe this hosting)

    $30 for 1 year of domain and hosting is such a bargain. Read more about NetKL. >here<

    Other hosting company that I suggest is Bluehost.Why? Because they are trustworthy and easy to use. Not only that , their customer support is also ah-mazing!

    Customer service for a hosting provider is super duper vital. I couldn’t stress this enough. Please take my word because any down time of your website, you need to contact them immediately. When I have any queries, I usually get a lightning responses from NetKl and Bluehost.

    How do you buy domain name and hosting ?


     > First, go to Bluehost.com here <

    After click the link, you’ll see the homepage of Bluehost

    ⚡️Now, go to the  top-left corner and click “WordPress”, then “WordPress Hosting“. You’ll be able to see this after click on that.

    ⚡️Click on “Choose Plan  that will take you to the list of the paid WordPress plans.

    ⚡️Click on “Basic“, which cover all the basic things you will need at this moment as a beginner.

    ⚡️Now ,you need to choose your domain name A.K.A your blog address.  Simply type any name that you think will suit your blog for long term .

    ⚡️Lastly, fill up your details and choose your term plan. The minimum you can choose is for 1 year and it goes up to 3 years.

    ⚡️Scroll down and uncheck every box except the “Domain Privacy+Protection, and provide your credit card details for the payment.

    Congratulations! You have successfully buy a land,address and home to your brand new blog! I cannot wait to see your success.

    But wait, you can immediately write a post but I suggest you to buy a theme to your blog first A.K.A buy the furnitures for your new home. Hooray!

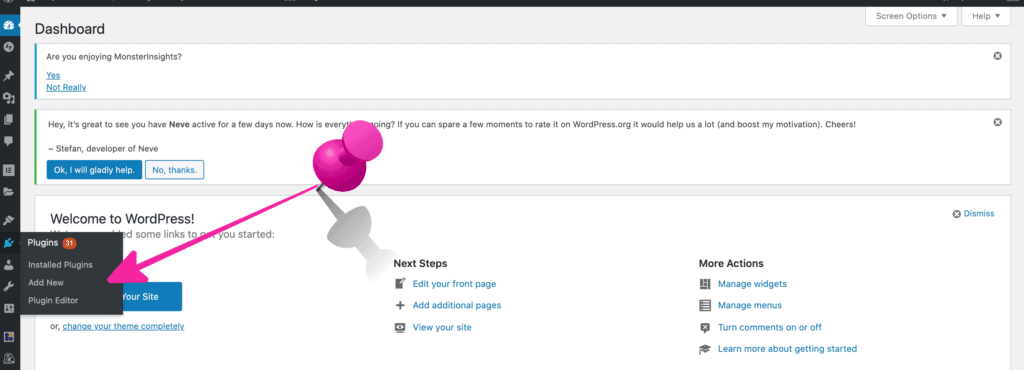
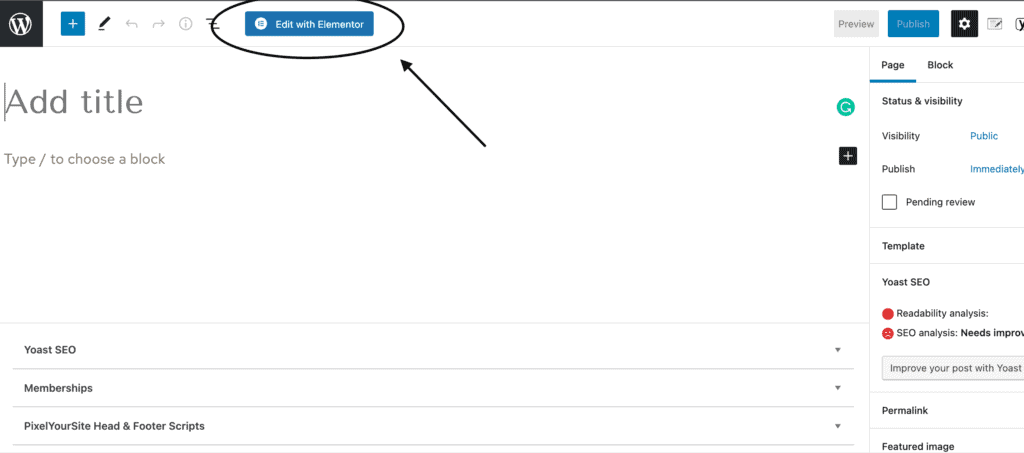
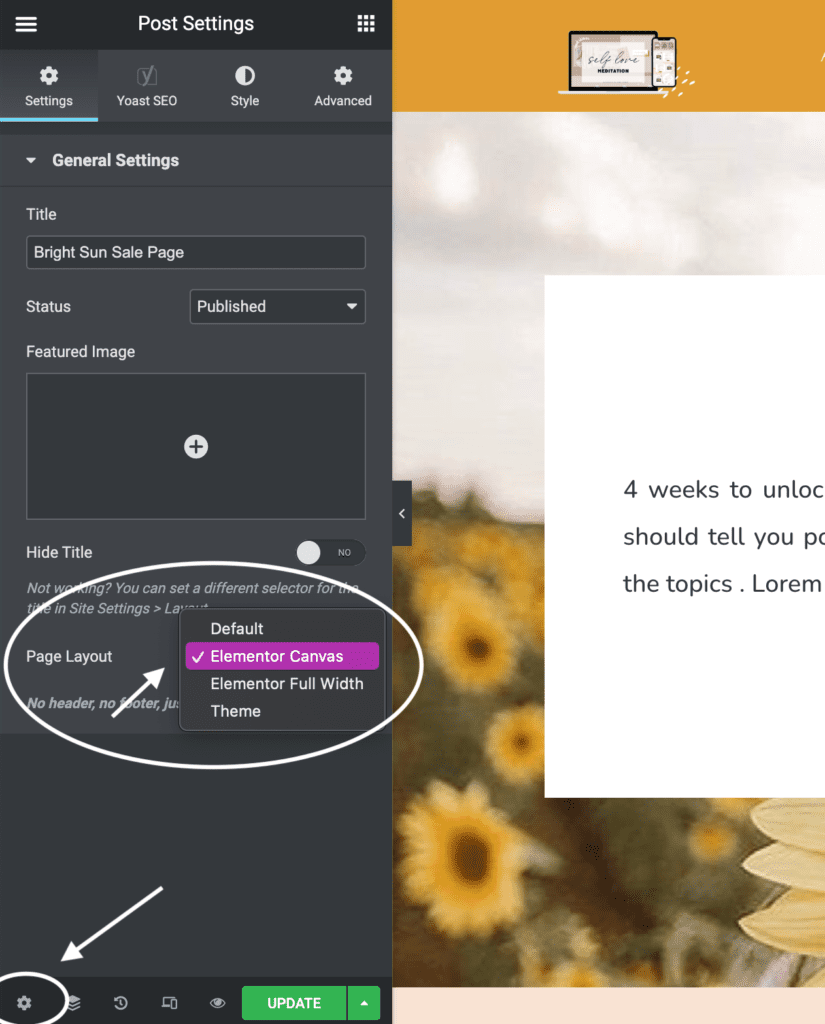
    DAY 3 BUY A THEME TO INSTANTLY GRAVITATE TOWARDS PROFESSIONAL BLOGGER

    This is the best part for me because I am addicted to beautiful WordPress theme that give a new breath of life the blog. Choosing a right theme for your blog is fundamental to look professional and trustworthy.

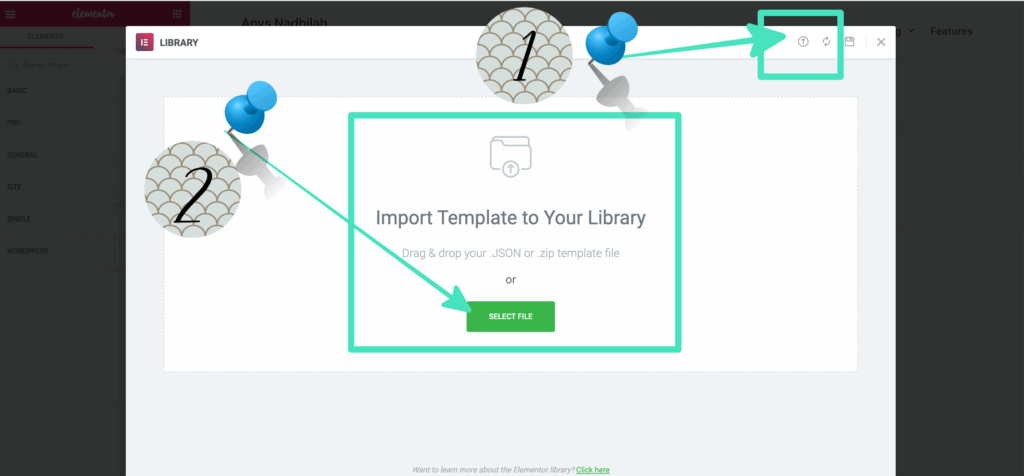
    I even designed my own theme and I would love for other people to use it because it going to be super useful for you to elevate your blog and branding. My theme for bloggers is a 3 page installation and it is designed for conversion .

     > Grab my Aesthetic Blogger’s theme here<

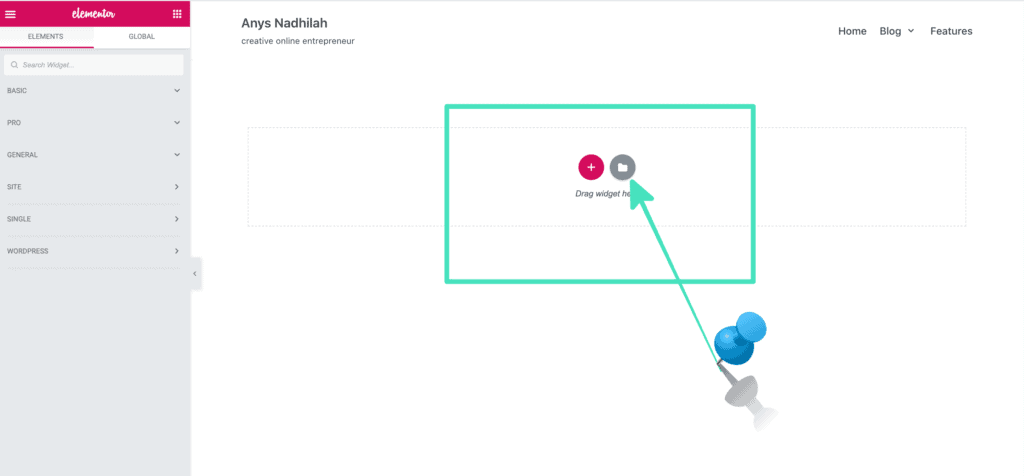
    Here is my signature wordpress theme for business. It is made from Elementor so it is just drag and drop theme, you will have a beautiful theme and branding within just seconds. This theme is perfect for service based business either you are a course creator, coaches virtual assistant, social media managers or freelancers. This is it!

    My theme business have tremendous support and I responded to every questions about the theme to ensure you’ll have the best experience. Kindly shoot me an email if you purchased my theme and have a questions about it..

    > Grab my Business theme for Coaches,Course creator and Service Provider here<

    I also have a lot of crush with other themes that I have encountered online and here is my suggestions.

    Top 5 Recommended Theme for Female Bloggers

    1. FemaleCEO theme (of course I have to mine on the first place)
    2. HelloYou Design ( Urgh their templates are amazing! I even bought use their template as my main theme )
    3. Bluchic theme ( Their theme is neat and sleek!)
    4. Little theme shop ( I adore their blogging theme so much. Still. Considering to purchase em )
    5. Themes from Etsy ( Etsy has variety of blogger’s theme that are really affordable for blogger. Simply search wordpress theme and you will find one or more that you definitely like)


    >Check out My Top 10 Blog Theme here..<

    DAY 4 CREATE A CONTENT THAT SELLS

    Now the most difficult part especially for me because I am a not knowledge-rich kind of person and I am the laziest girl on the planet.

    Regarding the content itself, even though I know how to do something, I struggled with how to explain it to others and try to make them understand what I’m trying to convey.

    That is because I have limited vocabulary in English because obviously English is not my first language.

    But you know content is KING and you got to deliver content if you are serious about blogging. Even though I have limited English writing and speaking skills, the powerful tips when comes to blogging are topic ideas brainstorming, and content planning (which I am good at).

    PRO TIPS
    Spend 15 minute of your time writing what you love, thought, and willing to share. Even though, if you are working as corporate job, you can take 15 minutes of your lunch break and start writing on notion… It might take 1-2 weeks to complete a good and viral blogpost but you have to believe ‘ IT IS FREAKING WORTH IT’

    It’s really important that you do not stumble upon blogging block. This was what most bloggers concurred with or struggle with. While starting a blog is actually an easy thing to do, but RUN a blog takes a lot of effort. Fret not girl, coz I got you covered!

    You will now learn my best tips on how to plan your blog content and how to brainstorm ideas for your blog.

    1. USE AN APP TO MANAGE YOUR IDEAS.

    The apps that I love and suggest is using Notion.

    Notion is a life changing app for you to use to plan anything in your life and that includes your personal life , study life ,business life and even blog Iife. I use a lot of apps before like Onenote, Goodnotes, Trello. I also have tried Evernote, Asana, Google Keep but I love Notion the most.

    Notion helps me to list down my ideas and also manage them at the same time and you have a lot of freedom using Notion.

    The best part is notion is FREE , and you didn’t have to pay a monthly subscription to it if you just use it for personal use. There is also a lot of free templates inside Notion and you can start planning what you desired on the spot.

    Of course, I’m not saying that I stop using all of the apps I that I mentioned before but a lot of the time, I prefer using Notions compared to other apps,obviously, I use different apps for different purposes but I think for planning purposes Notion is the perfect one.

    WHAT IS NOTION BEST FEATURES ?

    If I were to summarize their best features is that, you can create a

    1. Kanban board (just like trello) ,
    2. Tables,
    3. Gallery,
    4. Toggle features
    5. Timeline,
    6. Calendar and a lot more inside one single apps.

    Notion is ALL-IN-ONE WORKSPACE -> ONE TOOL FOR YOUR WHOLE TEAM. WRITE, PLAN, AND GET ORGANIZED.

    PRO TIPS
    Select an apps that have fast syncing time. As a Pro blogger you work using laptop but you want to be able to edit the articles using your phone as well.

    DAY 5 CREATE PINTEREST GRAPHIC

    Creating a blog is useless if you have no traffics at all and no connections ;( .

    What is the purpose of the blog if you have no readers at all.

    So, one of the easiest ways to start marketing your blog and start promoting it using Pinterest. Create your Pinterest account today and covert it to  business account for analytic features. The key secret here is to constantly add a new photo which is called as “Pins” to drive traffic to your website.

    How to create a Pinterest graphics?

    Use Canva.com !

    If you are totally new to Pinterest, I highly recommend for you to learn it through Youtube which is free or if you are really serious and you have the money to spend, you should sign up to a Pinterest course as well.

    Pinterest Courses that I recommend

    Here are a few Pinterest courses that I think will help you because they are legit and trusted. I believe they will deliver great tips and values through their experiences and expertise.

    • Pinterest Avalanche
    • Pintraction by Alessandra Caprice
    • Pinning Strategy by IncomingSuccess
    • Pinterest Ebook by AnnaSheApproach

    If you need proof of their techniques are  proven, you can just look at their Pinterest account where you will see they have generated hundreds thousands and millions of views every month.

    DAY 6 AUTOMATE YOUR PINTEREST ACCOUNT

    Holly Molly , who doesnt love automation right ! This is key!

    Use Tailwind to schedule and automate your pinterest account. Remember to create a few posts and a few pins first before you subscribe to Tailwind Plan. Get familiar using Tailwind trials which is free up to 100 pins.

    Here are few videos to watch on how to schedule your tailwind account.

    Most of these videos were short and they only have a chunk of informations so you have to sort the puzzle by yourself.

    If you want an easier ways to fast track your learning process , you can definitely check out Pinterest course out there that will teach you proven Tailwind strategies to skyrocket your blog traffics.

    These are the basic strategies that you need to master to start a succesful blog.

    Succesful blog = content + readers


    Now, I understand that at the end of the day,  we want to generate income with all these investment that we have made. I understand that we have a lifestyle that we desire, family to take care of and debt to settle (wether student loan / car loan/ house loan)

    So how can you turn your blog to money making machine?


    Here are some ways on how you can make money by blogging..  You may find it in Day 7 which talks about affiliate and Day 8 which talks about your own minimum viable products.

    DAY 7 MAKE MONEY THROUGH AFFILIATE PROGRAM

    DAY 8 MAKE MONEY THROUGH MV PRODUCTS


    Enter your email to unlock Day 7 and 8 right away...


    I hope you gain a lot of valuable lesson on how to start a blog in 2021. Easy peasy, right ?

    Like i said before , the hardest part is not to start a blog but to run a blog. You need to constant have a new idea of what to write and you need to actually write. If you love writing , you love sharing, this path is for you . It may takes time but it going to work.

    If you are serious about making money, start right now not tomorrow not later because procrastination is the thief of time.

    Grab My Blogger’s Checklist here

    [et_bloom_inline optin_id=optin_4]

    If I can rewind my time back, I would tell to my 23 years old me to start a blog now even though you dont know what to write and what to share.

    Just start sharing, make it as a habit and drive traffic to the blog using Pinterest. Yes, it is time consuming but it going to be worth it.

    2 years forward , you might have a few hundred or thousand of readers by now.

    Sadly , I didn’t do that because I let anxiety and excuses get through me. Don’t follow my old path. But practice what I have mentioned in this guide.I have learnt a lot until I able to put together this guide..

    2021 tell me to stop doubting myself and start blogging seriously after seeing all income reports from all the bloggers. They are my true motivation. Finally there is light at the end of the tunnel..

    What is your motivations? Comment down below..

    Thank you so much for reading 😉

  • How to Pick Blog Niche that generates $1000/month and Selecting The Right Blog Platform

    For those not down with the lingo yet, a ‘niche’ basically means a subject or a topic. This is the area of interest that your website is going to focus on and it’s what you’ll be writing about on a daily basis for your blog posts.

    This might sound like an easy job – but picking your niche is actually something you should consider very carefully. Getting this right can make your life a lot easier, while choosing poorly can make it almost impossible to achieve the success you’re looking for.

    Here we will look at some considerations that you need to bear in mind when picking your niche.

    A Topic You Enjoy

    Tip number one is to always choose a niche that you enjoy reading and writing about. Blogging is not a ‘small’ job by any stretch of the imagination. Remember when we said it would essentially need to become your full-time career if you wanted to be very successful? Well then you have to ask yourself – is this something you will be happy to write about on a regular basis?

    Writing will also come a lot easier if you’re well-versed in the subject. You’ll need to do less research and at the same time, you’ll find it much easier to come up with new interesting topics that people who like the subject will be interested in. What’s more, your passion will come across in the content and people will be much more inclined to read more of what you have to say as a result.

    Even if you plan on outsourcing your writing, knowing the niche you choose well will help you to feel excited about your site and to check over the accuracy and usefulness of the writing you’re receiving. Ultimately, choosing a niche just because some ‘guru’ says it’s a profitable one is a fast track to becoming bored and disillusioned and ultimately giving up.

    Popularity

    When picking your niche, you need to think about the competition out there and how easy it is going to be to stand out. Of course you want a subject that has a large potential audience, so why not pick something big like ‘fitness’ or ‘cars’?

    Well, that’s a good idea on the face of it until you think about how many other bloggers are writing in those niches. Bodybuilding.com is one of the largest sites on the net and it generates a huge turnover – most of which is invested back into the site to ensure a steady flow of new topics. Question is: can you compete with that? Are you going to be able to compete with any of those sites to get to page one?

    On the other hand, if you choose to blog about rearing stick insects, you’ll likely find that there’s a much smaller audience – but also far less competition.

    The best case scenario then is to find a topic that is popular but that isn’t so popular that it’s going to attract lots of huge companies and top-name bloggers. Things like ‘foraging’, ‘knitting’, ‘writing’, ‘parkour’ are all big without attracting too much attention.

    Broad vs Specific Topics

    Another strategy is to start with a topic that has a broad appeal but then to narrow it down to something more specific. For instance if you like fitness, how about picking a certain area of fitness such as running or CrossFit?

    Or alternatively, what about targeting a particular group? For instance ‘fitness for diabetics’. You can also try combining two different topics. A great example of this is the blog ‘Nerd Fitness’.

    Another alternative strategy is to go very broad with your chosen niche which has the advantage of allowing you to come up with lots of new angles for content. If you do this though, you risk a lack of focus so you need to ensure that you keep everything tied together with a common thread. A great example of this is the ‘Art of Manliness’ blog. This blog writes about anything that could be considered ‘manly’ – so that includes editorials on the role of the modern man but also posts on how to smoke a cigar or enjoy whiskey and posts on how to raise children. This gives a huge broad range of topics for the writer while still having a very strong brand identity and focus.

    Choosing a Profitable Market

    Another consideration when picking your niche is whether or not it’s profitable. That’s right: some niches are far more profitable than others and you’ll find it easier to monetize depending on which one you pick.

    Examples of highly profitable niches include finance and business. These are profitable because they offer ROI in themselves: someone will be happier to spend money on an eBook about earning money because in theory they’ll make that initial expense back.

    Likewise, there is money to be made in any niche that has a big and obvious ‘value proposition’. A value proposition can be thought of like an emotional hook – it is the thing that people will want to buy your products or read your blog for and the ‘way’ that they hope their lives will benefit. Fitness is a great example because people badly want six pack abs and are willing to pay. The same goes for dating.

    Monetizing that blog on raising stick insects on the other hand will be harder. There is simply not the same demand or ‘need’ for products here. That said though, the relative lack of competition in the area, combined with the relative scarcity of information means there are certainly ways to monetize.

    Ultimately it’s worth just thinking hard whether or not your niche is going to be profitable or not and weighing this up when choosing whether to write about it. Look at your competition to see whether they look to be making much money, think about your business model and maybe even try verifying your intended business model. Verifying means trying to sell to your target audience first to see if they are actually there and if they are actually interested in buying your product.

    Selecting The Right Blog Platform

    Got your niche? Great! The next thing then is to think about actually setting up your new site and getting started with your content. To do this, you will need to choose a ‘blogging platform’ which effectively dictates how your site’s code will be structured and what you’ll see when you’re logging in and adding content.

    Now of course, you don’t actually need a ‘blogging platform’ as such. You can go about building your own website from scratch which will involve creating pages in HTML and CSS, possibly using a builder like ‘Dreamweaver’ but if you do this it will take a lot longer and be much harder to create something that looks and performs like a professional website.

    Instead then, you want to use a blogging platform/CMS. CMS stands for ‘Content Management System’ and is essentially a tool that simplifies the process of designing and building your website, as well as adding and editing content as needed.

    Use a CMS and you won’t need to know a line of code in order to build the site, to add new posts and to edit your existing content. This of course saves a lot of time, it streamlines the process and it ensures that your site is at least functional.

    Choosing Your CMS

    So how do you choose a CMS?

    The first thing to do is to recognize the difference between hosted and self- hosted options.

    A hosted option is a blog platform that you use almost like a social network. In other words, you create your account and ‘sign in’ to another website and from there, you’ll then be able to add new posts for other users to see. In other words, the platform and so your website are already hosted somewhere online, meaning you don’t need to pay for a hosting account to get started.

    Good examples of hosted blogging platforms include BlogSpot (www.blogspot.com), LiveJournal (www.livejournal.com), WordPress Hosted (www.wordpress.com), WordPress Self-Hosted (www.wordpress.org) and Tumblr (www.tumblr.com). Each of them has strengths and weaknesses, though they all do essentially the same thing. Tumblr here is really the odd one out as it straddles the line between blogging platform and social media platform – and as it mainly focuses on images that you upload as opposed to written content.

    The great thing about this is that it’s a completely free process and requires absolutely no set-up. You simply visit the blogging platform, be that BlogSpot or WordPress, sign in and then start posting! You can make changes to your blog in terms of the way it looks but you’ll be quite limited in terms of what you can do. Likewise, you’ll also be limited in terms of your URL – meaning that you won’t be able to call your website ‘BodybuildingNewsArticles.com’ – instead your blog will have to be ‘wordpress.bodybuildingnewsarticles.com’ or ‘blogspot.bodybuildingnewsarticles.com’. This of course looks far less professional and it also means your URL is going to be far less catchy and brandable. People will likely not remember your URL and type it back into the address bar – they’ll have to search on Google. And that said, even searching on Google will be harder seeing as it’s not as easy to get hosted websites to ‘rank’.

    For all these reasons you’re much better off with a self-hosted CMS. This means you’ll need to pay for the hosting space too as well as a domain name. In all, this will likely set you back $100-$500 for the year but if you monetize well you should be able to make that make even in year one. If you plan on becoming a professional blogger, this is really a mandatory expense.

    When it comes to hosted blogging platform options, you have a few popular options. These include:

    • WordPress (yes, WordPress is both)
    • Joomla
    • Drupal WordPress is available as both a hosted and a self-hosted CMS option. If you go for the hosted option, you will simply need to visit WordPress.com and start an account. If you want to go for a self-hosted choice, you’ll instead want

    to download the install files from WordPress.com, then upload them to your server. You then navigate to one of the files in your browser and the set-up process begins.

    Which self-hosted platform should you use? The answer is WordPress by a long shot. The reason for this is partly that WordPress is simply the most popular blogging platform. In turn, this means it also has the widest support. That means that you’ll be able to find plenty of developers to work with who are well-versed in the platform and it means you’ll be able to easily find additional plugins and themes to install to take your site to the next level. We’ll look at what themes and plugins are in a moment but for now all you need to know is that they significantly increase the capabilities of your website and are often free to use.

    The fact that WordPress began life as a blogging platform also gives it another big advantage. That is that it is highly user friendly and compared with Joomla or Drupal, the control panel is much more accessible and easy to use.

    But most of all, you should use WordPress because everyone else does… That might sound like a somewhat lame reason but think about it: most of the most successful bloggers on the net use WordPress. Countless people before you have shown that a WordPress website can be incredibly successful… so why then would you use anything else that is much more of an unknown quantity? Why would you take your chances with a more complicated platform? We know that WordPress can be optimized for search engines, we know it can be very well optimized… if you’re serious about making money then it’s the logical choice. And the websites created with it look great.

    Choosing a Name and URL

    As you’re going with a self-hosted option for your blog, you’ll now need to choose a URL. This is the address that people will type in their search bar in order to find your website and as such it will probably also act as the title of your website and the brand you’re going with.

    Choosing your name is another very important step here and there are two big factors to consider when making this decision:

    • SEO
    • Branding SEO is search engine optimization – in other words, tweaking your website to ensure that it will likely to rank highly on Google and to show up in searches. Your URL affects your SEO because some URLs are much more ‘searchable’ than others and this will give you an edge over the competition. In other words, if you wanted to rank highly for our earlier example – bodybuilding news articles – then having an address like bodybuildingnewsarticles.com or bodybuilding-news-articles.com would be a great advantage. This won’t guarantee you’ll rank highly mind and those who have done more work at their SEO could still beat you in other ways – it’s just a good head-start and advantage. In terms of branding, you want to choose a URL that is the same as, or similar to, the name of your website. So a business called ‘Spination’ would do very well to get ‘Spination.com’. Again, this isn’t a requirement but it will make several things easier – not to mention promoting your site and making it more memorable.

    If you don’t have a site name yet, then this is a good time to think about it. Aim for something that’s unique and interesting, catchy and at the same time descriptive. In a perfect scenario your URL will tell people what your site is about without just being a boring description. So in reality, ‘bodybuildingnewsarticles.com’ is a dull URL that’s not great for branding. Much better would be something like BroNews, BBNews or MuscleTalk. This is easier for creating logos, for making an impression and more but it still will give you some SEO benefit and won’t be too obtuse.

    As for your ‘TLD’ or ‘Top Level Domain’ (the ‘com’ or ‘co.uk’ part), it’s still always preferable to aim for the ‘.com’ if you can. An exception to this is if you’re running a local blog in which case a regional TLD is better. In most cases though, ‘.com’ is the easiest to remember and thus the simplest to promote.

  • 6 Important Pages to Have on Your Blog to nurture know like and trust factor

    As well as posting content as blog posts, a WordPress site also lets you add pages. These will be static points of interest on your site that people will be able to view regularly whenever they’re interested in them.

    This blogpost will serve as a useful reference for adding pages to your blog…

    About Page

    An About Page is a page where you tell people about your blog. This is an excellent opportunity to explain your mission statement and to help new visitors make sense of everything they see on the home page. If you have lots of content, this can help you to tie a little bow around it all and to get people excited for your future output. You can also use this to weed out your ‘non audience’. In other words, to really hone in on your specific target demographic.

    Contact Page

    For gaining fans and for building new contacts and networking opportunities, a contact page is an absolute must. Leave this out and you might miss out on some serious opportunities!

    A good way to let people get in contact without opening yourself up for abuse is to use ‘Contact Form 7’ (https://wordpress.org/plugins/contact-form-7/).

    This is a plugin that adds a form to your contact page and helps protect you from spam.

    Services

    This is another great way to monetize your site! Why not turn some of that expertise into a service you can charge top dollar for?

    Products

    This is where you will promote your own products or your affiliate products. Some bloggers will call this page something like their ‘essential gear’ or their ‘survival kit’ and for real fans it’s a great place for people to gain some of your magic for themselves.

    Recommendations/Resources

    This is similar to the above but will work more purely for affiliate links. What products can you unreservedly recommend?

    Here is a screenshot of a blog using a ‘Resources’ page:

    ‘Start Here’

    The only downside with the blog format for websites is that it can be hard to find older, legacy posts and content. A good way around this is to have a handy ‘Start Here’ page that can act as a ‘jumping on point’ for your new visitors and show off the highlights of your site.

  • 7 Efficient Ways to Customize Your Blog’s Appearance

    From this point on we shall presume that you are using WordPress. If this is not the case, then most of the following advice will apply but some of the specifics and details may be different.

    Now that you have your URL and you’ve installed WordPress, you’re ready to start creating. The first thing to do? Think about the design you want to use!

    But that doesn’t mean your web design. This won’t come until later. Instead, you’re going to focus on your logo first.

    Why? Because your logo is a crucial part of your branding and chances are that you’re going to want to use a web design heavily inspired by your logo.

    Your web design will probably use colors from your logo, it will probably use certain visual cues and this will help to create a consistent design language for your entire site. It’s a great starting point and it will make coming up with your design that much easier.

    1.Creating a Logo

    So how do you come up with your logo? The first stage is to recognize what makes a good logo. Critical criteria here then are:

    1. Versatility
    2. Simplicity
    3. Originality
    4. Suitability

    It needs to be versatile and simple because you’re going to be using this in various different places throughout your online presence. Your logo will go right at the top of your website but it’s also going to go front and center on your Facebook page, it will be right up top on your Twitter page.

    And if you build an app then it will be there too. We’ll see later how important it is to have a strong presence on social media: and having a great logo will really make a big difference to that and will help to create brand visibility and loyalty.

    In terms of originality, you need to avoid obvious clichés that are present in too many logos. Ticks, globes and lightbulbs have been done to death and as such you should really avoid these unless you want your website to look like a massive cliché.

    That said though, don’t go for something so creative that it doesn’t communicate your message at all. Your logo should entirely on its own tell visitors what your site is about and what type of site they’re on.

    This will tell you whether the logo should be fun, whether it should be professional and whether it should be colorful. The Process A great process to go through when creating your logo is to create a mood board. This is essentially a collage where you will place everything that you can think of that you like, that relates to your business and niche and that you might consider emulating.

    This can be other logos, it can be photos of color palettes or it can be random sketches you’ve made. Create a big enough collection and eventually you should find that some themes and patterns begin to emerge.

    This way you can then start sketching some ideas, combining elements and trying out different approaches. Some you will like and some you’ll throw out. This spit-balling process though will help to lead you in the right direction.

    Likewise, it can help to look at the name of your website and brand and to try working with that. Are there any letters that could be morphed into one of your related items? What should the font look like?

    For text, it’s important to use an interesting font that looks professional. Ideally, you’ll also want to use a font that is unique to you. A good solution here then is to download a custom font from FontSquirrel.com (a great repository of free TTF and OTF files) and then to trace over your company name, making edits as you do to make it original. This way, your font will be unique but at the same time, it will be based on something that looks professional.

    Finally, take whatever you have designed and then simplify it and scale it back. Remove anything superfluous and the more you cut away, the better and more impactful it will be.

    Note that when you create your logo, you should do so using vector software. This includes the likes of Adobe Illustrator. Vector software works differently from raster software that produces PNG and JPG images. While the latter creates a ‘map’ of where all the pixels are going to go, the former lets you define the angle, length and direction of the lines that create the image. This means that vector images can be drawn at any size with no loss in quality and that you can easily make edits to the image when you need to use the logo in a new context. The best choice if you can afford it, is to use Adobe Illustrator. This will produce an AI file and you can then use that to make new PNGs as they’re needed.

    2.Choosing Your Theme

    Now you have your logo, you should have some ideas for your color palette and you should be ready to start thinking about the artistic direction of your website.

    At this point, with WordPress installed, you should already have a rather attractive looking website that utilizes WordPress’ default theme for the year. The current ‘Twenty Fifteen’ theme looks very sleek and modern with light colors and a very ‘picture heavy’ layout.

    You can swap the title for your new logo and right away you’ll see that it looks out of place. It’s also important to use a theme as otherwise your site won’t look very professional – it will look as though you didn’t know how to create a theme of your own and so opted to go with what was available by default.

    Adding a theme means applying a new layout and look that has been predefined for you. This can then instantly change the visual impact your website makes, as well as the way your visitors will navigate around it.

    You can find themes to install for free right through WordPress and can preview them through the control panel before selecting which one you want. The problem with free themes though is that they tend to be less professional looking than paid themes and they tend to have fewer options. At the same time, there’s always the risk with a free theme that someone else will have chosen exactly the same theme of you. This dilutes your brand identity and it doesn’t exactly scream professionalism.

    Instead then, it might be better to look for paid WordPress themes. This can again be done through your WordPress control panel, it can be done by looking on other sites like Theme Forest, or it can be done by hiring a team of designers to create a custom theme on your behalf. Of course that latter option is the best way to get a theme that is perfectly matched to your branding and your requirements.

    When choosing a theme, try to keep a few things in mind. For starters, you need to pick a theme that will be well suited to the type of website you’re going to create. Some themes are very image-heavy for instance and will feature sliders on the front page as well as lots of large crisp images linking to each of the posts you upload. This is a great way to make your blog look more modern and more visually compelling but at the same time, it’s also

    important that you consider the work that goes into this and the requirements. Will your content lend itself to being image heavy? Will you have the means and resources to acquire lots of large graphics that you have the rights to use legally? Do you want to spend time reshaping the content?

    Certain themes will also be well suited to sites with lots of content and will have large menus for finding your way around. Other themes on the other hand will be better suited to sites that are made up of a single or a few static pages.

    You should also look for some specific requirements for your theme, no matter what type of blog you’re looking to create. Make sure that:

    • The theme is responsive, meaning it looks good on any sized display
    • The theme is optimized for mobile in other ways – for instance, the buttons should be large enough to be pressed with a finger instead of a mouse click
    • The theme is quick to load so that people don’t get bored and leave and so that Google doesn’t penalize you
    • The theme looks good and professional and is easy to navigate If you’re torn between themes, try taking a look at some of the blogs that you enjoy and admire. What layouts do they feature? What is good or bad about that? Again – if they’ve shown that that kind of layout can work, it basically verifies the strategy and ensures you won’t be wasting your time working with a doomed web design.

    3.Customizing Your Theme

    WordPress is highly customizable and this is another one of its huge advantages. We’ve already picked a website theme but now we can go one step further by tweaking that theme to be just the way we want it.

    WordPress allows you to do this by default under the ‘Appearance’ tab where you can change things like your header and footer, your logo, your background, the color scheme etc. Most themes though will also come with their own options panel where you can make additional tweaks and customizations.

    One thing you should do right away is to match elements of your website to your logo’s precise color code. This will create a strong sense of

    consistency throughout your web design and will ensure that everything matches neatly. It’s not enough to feature ‘almost the same’ blue – it needs to be 100% identical blue.

    4. Color Palette

    At the same time, think about the other colors on your website. One way to do this is by applying a little ‘color theory’. Color theory basically tells us which colors should look good together and which shouldn’t on a color wheel.

    When using this approach you have a number of options. One is to pick ‘complementary colors’ which are the colors opposite each other on a color wheel. Purple and green look good together for instance as do any combination of three colors spaced evenly apart. Another option is to go for ‘analogous’ colors which are colors that are directly next to each other on the color chart.

    Finally, you can also pick ‘natural’ color schemes. These are color palettes that you select from photos in nature: looking at photos of natural scenery and picking out the colors that occur heavily in those.

    Make sure to think about practicality as you do all this. Just because a color scheme looks good, that doesn’t make it appropriate for a website. Ask: is it easy to read?

    To get help with finding your colors, try going to Pintrest and search for “color palette”. You’ll find images of colors you can combine.

    5. Fonts

    Another consideration is your choice of fonts. This is a relatively small detail in the wider context of your web design but it’s actually small details like this that make a web design look professional and give it that ‘sheen’.

    Don’t just work with the fonts that came with your theme then: think about adding new typefaces that will be easy to read on a range of devices and that will complement the tone and topic of your blog.

    For instance, a ‘serif’ font is a font with the small feet at the ends. More often we use ‘sans-serif’ (no feet) fonts on the web because it’s generally easier to read and it looks very crisp, minimal and modern. But if your blog is going to be reporting news, or if it’s literary in nature then you might want to consider using a serif font. Why? Because serif fonts have been traditionally used in print mediums and as such they have become associated with that kind of niche.

    Combining fonts can also be used to good effect. For your headings and titles for instance you might opt to pick something bolder and larger without worrying as much about legibility.

    6. Choosing a Background

    Adding a custom background can also do a lot to customize the look of your theme and this is something you can update yourself relatively easily. Again, pick something that is on-point as far as your niche goes and which will add to the look and feel of the site.

    7. Adding Widgets

    Another way to customize your WordPress theme is by adding widgets to the sidebars. Widgets are small forms, sidebars and other elements that can provide all kinds of functions on your site. For instance, many ‘opt-in’ forms for mailing lists will take the form of widgets, as will many advertising slots, feeds from social media etc. Using widgets is a great way to give your site more features and you can add additional widgets by installing them as plugins.

    Just go to Plugins – then add new plugins to find widgets and ‘behind the scenes’ tools that will enhance your site’s performance in all manner of ways.

    Outsourcing

    If all this is sounding rather complicated then there is an easier way – which is to try finding an a company you can outsource the work to. A great way to do this is to visit a freelancing site where freelancers can post their CVs and you can post your job offers.

  • How To Generate Recurring Revenue and Profit From Your Blog?

    You know you need to grow your blog to the point where it’s getting tons of traffic to get monthly profits. But while this is highly rewarding, it’s not going to give you the freedom that you’re looking for. This will not be enough to enable you to quit your day job and to start lying in in the mornings/spending more time with your family/travelling.

    To do that you’re going to also need to monetize your blog – in other words ensure that it’s bringing in cash.

    So how do you do that? The answer might surprise you…

    Consider This Before You Spend A Single Cent On Advertising

    Many people believe that the best way to make money from a website is by putting ads on it – specifically like Google AdSense that will pay out every time they get clicked (this is ‘PPC’ advertising meaning ‘pay per click’)

    Simply sign up for an account at https://www.google.com/adsense, create your campaigns, paste the adverts you create onto your site to embed them in your content and then ensure that lots of people are going to your site.

    Problem is though, you’re only going to earn a few cents per click from those ads. If you’re getting hundreds of thousands of views per day, then this can be a good way to earn a fair amount of passive income – but even then there are smarter and more effective ways you could be earning more.

    The thing to keep in mind here is that those advertisers are willing to pay you that much for your traffic. What this tells you, is that the customers are worth more to them than the small amount they’re paying you. That means

    they must have found a better way to monetize their site – likely by selling a product or perhaps an affiliate product that they’ll gain commission for.

    Either way, this now means that you’re selling something for less than it’s worth. How do you get to the top of the pile?

    Creating and Selling Products

    The very best way to make money from a blog is to sell something. You can do this by purchasing inventory in bulk and then selling it on for more than you paid for it but this is a rather involved and complicated process with a number of challenges.

    What’s much easier then and what’s particularly well suited to blogging, is to sell an informational product. That means an e-book, a book, a digital course or something else.

    (Above: an information product created by DigitalMarketer.com)

    As a digital product, these options will have zero overheads for you and no delivery costs. What’s more, you’ll be able to demonstrate value and build trust in your product through your content marketing very effectively. Throw

    in some adverts for your product and some promotion within the body of your content and you can make a lot of money this way.

    Note that if you aren’t confident enough or don’t have the time to write an entire e-book, you can always outsource the process using the likes of UpWork (www.upwork.com), Freelancer (www.freelancer.com) and Elance (www.elance.com).

    Affiliate Marketing

    Or if you’d rather not invest the time or money in creating products, another choice is to skip that part and instead sell someone else’s product. You can do this by becoming an affiliate marketer, meaning that you’re now selling a product for commission. If that sounds like a step-down from selling your own product, bear in mind it gives you a much wider selection of things to sell and that it means you can choose products that are already highly successful.

    If you find an affiliate product through a site like ClickBank (www.clickbank.com) or JVZoo (www.jvzoo.com), you’ll be given an affiliate link to promote and every time someone clicks on that link and buys the product you’ll get around 40-60%. A great strategy then is to include product reviews as blog posts, or to have a list of ‘key resources’ for your readers that promote these items.

    Another option is to choose Amazon’s affiliate scheme. This pays out a much smaller percentage but on the other hand, it gives you access to a gigantic selection and it lets you sell through a retailer that people already use and trust.

    Look for widgets and plugins that will let you add your adverts in the sidebars and under the headers of your site. These key spots bring in more clicks and more money without being distracting or disruptive for your visitors.

    You can use a plugin like “Amazon Product in a Post Plugin” to add formatted Amazon products to any page or posts. It’s free: https://wordpress.org/plugins/amazon-product-in-a-post-plugin/

    Building an E-Mail List

    Think of your website as a sieve. Most of the people who visit it will read it, enjoy it but then fall through the tiny holes never to be seen again. At this point they are lost.

    This is why e-mail marketing is so important. With e-mail marketing, the objective is to get visitors to sign up for a mailing list so that you can update them with news about your new posts, new products and more. This lets you turn a one-off visitor into a loyal fan and someone you can reach regularly. Don’t rely on RSS feeds for this kind of loyalty – it’s only a small selection of people who use these and barely anyone will subscribe to an RSS feed on Feedly on their very first visit.

    To create a successful mailing list, you will need to use an autoresponder along the lines of Aweber (www.aweber.com) or GetResponse (www.getresponse.com). These will manage your contacts, allow you to send large bulk e-mails and also automate the process of signing up or unsubscribing.

    Once you’ve chosen a platform and signed up, you’ll then be given the opportunity to create an ‘opt-in form’. This is where your visitors will enter their details if they want to sign in and it’s what you should work to promote if you want to get the maximum visitors possible.

    Fortunately, it’s relatively easy to insert opt-in forms into your sidebar and into the bottom of your posts. This won’t be enough to encourage first time viewers though: if you want to go the extra mile to secure subscribers (which you really should) then you should incentivize your mailing list with an e-book, a free report or some other kind of freebie.

    Likewise, you can put your opt-in form into a lightbox that appears over the rest of your content. SumoMe (www.sumome.com) is one example of a useful ‘pop-up’ lightbox you can use to convert your one-time visitors into subscribers and long-time customers.

    Now make sure you keep your mailing list active by notifying your members of new updates to the blog and by mentioning your offers and promotions.

    Note that pretty much every major blogger describes their mailing list as one of the absolutely crucial aspects of their business model. Don’t ignore this!

    Socializing Your Blog

    Post regularly enough and your blog will begin to generate ‘long tail’ keywords and will get traffic from Google. You can help this as well by exchanging guest posts and submitting your links to directories and forums to create a big ‘in-bound links profile’.

    In this day and age though and especially for bloggers looking to build a personal brand, social media is going to be your very best tool for promoting your site. This will allow you to directly reach your target demographic, to engage with your audience and to grow your list of fans and followers.

    So how do you go about effectively ‘socializing’ that blog?

    The Basics

    The first rule of social media is ‘be everywhere’. This means you should have an account on Facebook, on Twitter, on Instagram (which is actually bigger than Twitter!), on Google+, on LinkedIn… you name it! And across all these accounts you should have a consistent logo, a consistent brand name and a consistent mission statement and niche. This will help to give people more ways to discover you and it will present more ways to share your content.

    Now when you post your blog posts, you should also share them to all these channels. As you gain more visitors, more people will gravitate towards your social media. And as they grow in number, the content you share there will automatically start to perform better.

    At the same time, you should also think of sharing your links to social sharing sites – like Reddit (www.reddit.com) and StumbleUpon (www.stumbleupon.com). Also good are Facebook groups and Google+ communities. This way you can find specific audiences for your content who will be likely to enjoy your content and to share it and promote it.

    In fact, every time you write a new post for your blog you should have a good idea of all the ways you can share it socially. Where will this be the biggest hit? Who precisely are you aiming this post at? Think of your route to market right from the start and you’ll all but guarantee succeed.

    Of course you should also add social sharing buttons right into your content. You can do this with a plugin like Shareaholic (www.shareaholic.com). This lets your visitors share your content with their contacts if they should enjoy it.

    Creating a Community on Your Own Blog

    Another smart tip is to try turning your own blog into a community itself. You can do this with an active comments section (use the plugin in Disqus which has a lot of advanced features and useful advantages) and by just making sure that you always respond to comments and generally encourage conversation. Try to end your posts with an invitation for people to discuss more – or even end them with a question.

    And do take the time wherever possible to answer e-mails, messages on LinkedIn etc. Don’t underestimate the value of a single highly loyal fan!

  • How to install Elementor templates for WordPress theme

    Hello Gorgeous! The steps to install the theme are really simple and easy, so we are going straight to the point. If you have any questions or face any difficulties, just let me know.

    1. Go to your WordPress dashboard by accessing yourwebsiteurl.com/wp-admin
    2. Make sure you have Elementor plugins (free version or pro version).
      Some theme works best with Elementor pro (depending on your purchase).
    3. If you don’t have the Elementor plugins yet, feel free to download them.
      Go to Plugins -> Add new -> Search Elementor –> Click install –> Activate

    4. Now create a new page to load your Elementor template. Go to ‘Pages’ , click ‘Add new’.
    p/s If you bought multiple Elementor templates, to speed things up, just create multiple pages and name it as ‘Homepage’, ‘About me page’, ‘Portfolio page’ at the same time by opening multiple tabs.

    5. Click ‘Edit with Elementor as shown below and the Elementor page should pop up after that.

    edit elementor

    6. Click the ‘Folder icon’ and ‘upload icon’ as shown below.

    7. Finally click ‘Select file to import the Elementor template to your Elementor Library. Then, when the file is already been uploaded, click the button ‘Insert’ to insert the template to your page.

    Now your blog pages are ready. Hooray!

    You can start customizing the theme by just drag & drop and edit the color to customize the page according to your brand color. Don’t forget to change the link as well.

    -FAQ-

    👉🏻How to set your default WordPress homepage.

    1. Go to your WordPress dashboard by accessing yourwebsiteurl.com/wp-admin
    2. Click Setting –> Reading –> Select your ‘homepage name’ to change the front page of your website.
    3. Voila!

    👉🏻How to select right layout

    Make sure to select the right layout for your page for the best view.
    – If you want a full Elementor page view (no original header and footer), select Elementor Canvas
    – If you want to maintain your current website header and footer, select Elementor Full Width

    👉🏻How to set your default WordPress-Elementor blog page.

    1. Go to your WordPress dashboard by accessing yourwebsiteurl.com/wp-admin
    2. Hover to Templates -> Theme builder
    3. Click Add new -> Choose Template –> select single then select ‘post’ -> upload your Elementor blogpost template. Now all your blog posts will follow the Elementor design that you uploaded..

    ⚠️TROUBLESHOOT⚠️

    If you are received an error message, that means you need to either
    Install Elementor Pro (some templates use Elemetor Pro -already stated during purchase)
    Update your Elementor Pro plugins
    Increase your blog host capacity to upload files. Some Elementor templates are big size. Most of the time, the error occurs due to blog host upload capacity. So what you need to do is to change the upload capacity to a bigger size. I recommend changing it to 512mb or 1gb.

    Here’s is the tutorial to increase the host upload capacity limit.. 

    1. https://wpdeveloper.net/fix-max-filesize-elementor/https://www.youtube.com/watch?v=X5aFXKXW6IYhttps://www.youtube.com/watch?v=Uvrl-MT0OZg

    Woocommerce
    This is the tutorial to setup Woocommerce in your theme.. https://elementor.com/blog/woocommerce-tutorial/

    Enjoy your new business theme or sales funnel!